Antennae | Preheat | Panel | Switch Layout | ELT | Arm Rest | Canopy Lock | Steering Link | Rudder Cable Fairings | Oil Door | Five Point Harness | Extended Range Tanks | Trim/Flap Controllers | Smoke | Removeable Floors |Sam James Cowl | Wheel Pants | Electronic Ignition | Brakes | Oil Cooler | Prop | Engine | Dynamat | DecalPro | Lighting | Tailwheel | Mapbox | Battery Charger | Interior | Fuel Pickups | Fuel Caps | Fuel Valve | Conduit | DIY Headset | Cowl Attatch | Fuel Sampler Attach | Headset Jacks | Polishing | Ski/Golf Clubs | Covers | Panel Lighting | Cap Screw | Wire Routing | Tank Building | Cup Holders | Supertracks Mod |
AntennaeTop
Saving for future consumption:
Bob Archer Wingtip Nav Antennae – $125 each, need 2.

Archer Wingtip Antenna.
RAMI AV-17 COM ANTENNA – $185 each, need 2.
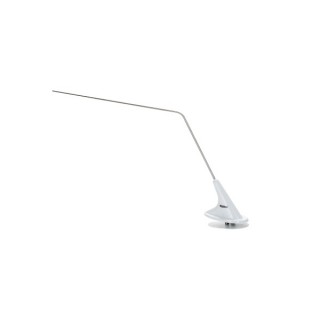
Rami AV-17.
PreheatTop
I’ve been hanging out in the garage recently with wind chills below zero (I know the wind isn’t blowing in the garage, but hey, I’m trying to be dramatic), and I’m thinking about the distant future of cold-starting the RV-7.
So, I’m documenting both the need and my current choice for preheat.
From Reiff Preheat:
Turbo & Turbo XP Systems
These are like the Standard System below but “Turbocharged” with extra power for faster heating and colder climates.
Turbo doubles the wattage on the oil sump (50 w per cylinder + 200 w on oil)
Turbo XP doubles the wattage on the sump and the cylinders (100 w per cylinder + 200 w on oil)
Turbo XP is our best system
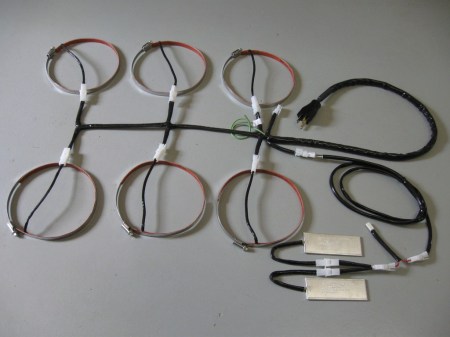
The Turbo XP System. (100 w per cylinder + 200 w on oil), shown here on a six-cylinder.
Oh, and of course you’ll need a remote switch…
From http://www.gsm-auto.com/…
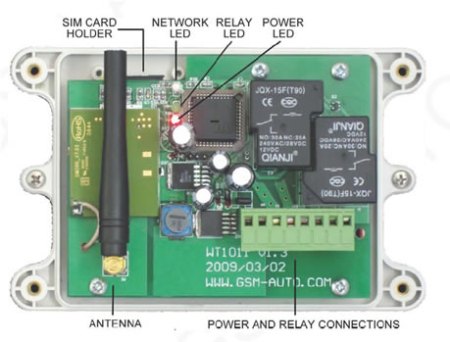
GSM Remote control switch. Out of stock.
Apparently they aren’t selling anymore, but they have a link searching Amazon for “GSM Remote Control. So, I guess I’ll do that…
PanelTop
July 2010 Update: After sitting in an actual aiplane, I think the radio stack is too far for my liking. Here’s one with the stack centered.

Pretty pictures…
March 2010 Update: I added a 3rd option for consideration.

My panel layout, with one 10-inch display and one 7-inch display. Nice, huh?

My panel layout, with two Dynon 10-inch displays. Me likey.

My panel layout, with two Dynon 7-inch displays.
January 2010 update: I’ve heard a little about the Dynon SkyView, supposedly starting to ship in December of 2009. Very interesting, and the price should be more palatable. Nice features: built-in autopilot, EFIS, Engine monitoring, backup battery, ADAHRS. I’ll probably use dual 10″ displays, space allowing. Pretty slick. My estimate is $11,800 for my specific setup. A little better than $70k for the equivalent Garmin. Dynon Skyview – $11800 (my estimate for dual 10-inch screens)

Don’t fly into that mountain, guy.

I’ve been playing with layout right now and have a poorly modeled (CATIA) concept drawn up.
My panel layout, with one 10-inch display and one 7-inch display. Nice, huh?
The other option is two ten inch displays, and don’t know if the radio stack would be too far right. Thoughts?
My panel layout, with two Dynon 10-inch displays. Me likey.
Please keep in mind that I know I won’t need the trim indicators with the Skyview system. Also, I don’t love the mapbox, but I was just trying it out for spacing reasons. I also don’t know whether I’ll require (for IFR redundancy) a sensitive altimeter and a whiskey compass (at the top of the pictures). So many decisions to make.
GMA 240 (Non-TSO’d audio panel) – $795

GNS 430W (GPS/NAV/COM) – $8095

GTX 330 (Mode-S transpoder) – $3649

GTS 800 (Garmin Traffic Advisory) – $9995

I like the idea of having TAS in the airplane. Looks like the GTS 800 interfaces with the 430W pretty well. Oh, it’s $10k. Nevermind.
SL 30 (Nav/Com) – $3729

Dynon EFIS -D10A w/battery (backup attitude, airspeed, altitude, HSI capability) – $2248 I may go with the D6 instead. Same unit, but no HSI/NAV capability. Depends on whether I add a dedicated CDI out of the GNS-430W, or use the HSI capability from the D10A. Let me know if you have thoughts on that subject.

Fall 2009: I haven’t given a lot of thought to the panel yet, but I am positive I want a capable IFR platform for XC flying. I also want to make sure I have PFD/MFD/EICAS instead of the more traditional six-pack. Right now, if money were no object, I would put in the Garmin G900X. Here are the G900X specs from Garmin.

Garmin G900x
I saw a picture of someone’s airplane on SteinAir’s website. Here’s the actual RV-7 panel photo. I believe the panel belongs to Fred Shiple.

RV-7 G900x
Oh wait, the G900X is almost $70k. That would be a “no.”
Switch LayoutTop
I used some of Bill R’s discussions on VAF to help finalize (finalize? really? of course not!) my thoughts on switch layout. See more of Bill Repucci’s website and his instruments page. His big emphasis is on phase of flight, so I’m following that same general path. Left to right, what I need first to what I need last (except for strobes, which will need to come on before engine start, but I can’t see putting that left of starter enable). My current thoughts, from left to right:
| Switch | Group label | Switch Type |
| Main Bus Master | DC Power | Locking DPDT Toggle |
| AUX BUS Master | Locking DPDT Toggle | |
| Bus Tie Closed | SPDT Toggle | |
| E BUS ARMED | DPDT Toggle | |
| L PMAG | Ignition | Locking SPDT Toggle |
| R PMAG | Locking SPDT Toggle | |
| Starter enable | Starter | Locking SPDT Toggle |
| Position lights | Lighting | SPDT Toggle |
| Strobe lights | 3-position Toggle | |
| Taxi Light | 3-position Toggle | |
| Landing | 3-position Toggle | |
| Pitot Heat | Pitot Heat | SPDT Toggle |
| Fuel Pump | Fuel Pump | SPDT Toggle |
- BAT/ALT – locking three position switch (OFF – BATT-BATT/ALT). Or use a locking two position switch, alternator always on with the battery, and pull the main alternator field breaker if needed.
- EBUS/AUX ALT – locking three position switch (OFF-EBUS-EBUS/AUX ALT). Or use a locking two position switch, same as #1.
- Left Magneto – locking two position switch.
- Right Magneto – locking two position switch.
- Electronic Ignition (g3i) – locking two position switch.
- Starter Enable (could be covered toggle, or could be simple ON-OFF keyed switch for tampering…not theft…but silly people reaching in my airplane and grabbing the stick.
- Avionics Master – locking two position switch.
- Position (Nav) and strobe lights (I’m thinking of combining Nav and strobe with a 2-10 switch (OFF-ON-ON), but do I always want the strobes on with the nav lights? I don’t know. Clouds? Turn the strobes off, but then if you are in a cloud such that the strobes are bothering you, do you want the nav lights on, too?)
- Taxi lights (one in each tip) – circuit breaker/switch combo
- Landing lights (on in each tip)- circuit breaker/switch combo
- Wig-Wag (only for landing lights, maybe incorporate this into the landing light switch with an OFF-LDG-WIGWAG).
- Pitot Heat – circuit breaker/switch combo
- Fuel pump ON indicator light.
- Fuel boost pump – circuit breaker/switch combo, above throttle knob.
- Flaps backup switch (ON)-OFF-(ON) or (ON)-OFF-ON with up-limit switch, but that is complicated – above and right of throttle.
- Throttle
- Prop
- Mixture
- Smoke ON indicator light.
- Smoke switch (OFF-REMOTE-CONTINUOUS). The remote setting will allow a stick-mounted switch to operate smoke. The continuous setting is…well…continuous smoke.
- Copilot Stick Trim Enable (If I use two Infinity grips)
- Copilot Stick Switches Enable (If I use two Infinity grips) (may combine the stick enables in a 2-10 or locking with OFF-TRIMS-ALL)
- Copilot Push-to-talk switch (in addition to the stick-mounted switch, these are nice on the panel.)
- Instrument(displays) dimmer
- Panel lights dimmer
- courtesy (footwell and baggage area) dimmer
- Circuit Breakers for equipment that doesn’t have a combo switch/breaker
- Eyeball vent (fresh air), Pilot Cabin Heat and Pilot seat heat will be on the lower panel extensions left of the pilot’s left knee.
- Eyeball vent (fresh air), Copilot Cabin Heat and Copilot seat heat will be on the lower panel extensions right of the copilot’s right knee.
- Intercom Stereo Input – Upper right of instrument panel.
- Hot Battery Bus 12V power (maybe switched) – Upper right of instrument panel.
Looking at Stick switches, I blantantly stole this from Infinity Aerospace: Typical Stick Grip Switch Combinations for Aircraft WITH Electric Flaps AND Autopilot:
- (thumb operated 4-way switch via China Hat) — Pitch and Roll Trim
- (index finger) — Push-to-talk
- (top – thumb side) — Flaps – ON/OFF/(ON) toggle switch using a limit switch on the UP side in series with the Flaps/Speed Brake motor
- (half way down, thumb side) — Auto Pilot Disconnect ( Normally Open push-button (8632 N.O.))
- (pinky switch) — Auxiliary Fuel Pump ON/OFF, maybe Transponder Ident? (Assume other hand is on throttle, fuel pump just above that, maybe
- (top – knuckle side) — Engine Start Normally Open (8632 N.O.) push-button
ELT and Strobe Power Supply LocationTop
After visiting From Ross Schlotthauer’s RV-7 Page, I decided I am going to incorporate some of the tips he outline on his Tips page.
The first one was for the ELT and Strobe Power Supply Location. There is a lot of discussion on the forums, and if I were building a tipup, I would mount it right behind the rollbar, but since I am going with the slider, I am thinking the tail may be a good idea. This gets it hidden, but still able to transmit well.
Another thing. I found this on Bill Respucci’s site.

I like this as a mounting location for something. I’m not sure OAT would be good here (the fiberglass is going to act like an oven in the heat), but something will go well here.
Arm Rest StiffenersTop
The armrest stiffener mod is something a lot of people do.
Canopy LockTop
Having a single key for both the Canopy Lock and the ignition sounds nice. More about this in the stick-mounted starter button section.
Rocket Steering LinkTop
No big surprise here, the Rocket Steering Link seems to be nicer than the OEM Van’s link.
Rudder Cable FairingsTop
I like the custom rudder cable fairings. I don’t know if it decreases drag at all, but it sure makes the airplane look a little sharper from the rear. I did see a cable fairing at the Mid-Atlantic Fly-in that was mounted from the inside with a single #6 screw (into a nutplate attached to the fairing.) It looked really good, and I will probably mimic its setup.
Invisible Hinge Oil DoorTop
I can’t remember whose page I swiped this from, but I like the invisible hinge oil door. Here are a couple pictures for your viewing pleasure.

Look Ma! No hinge!

This picture is just so I remember how to make it when the time comes.
Five Point HarnessTop I’m not sure which harness to go with, but I am sure that I want a five point setup. Here are the big hitters:
Extended Range TanksTop
I don’t think I’ll really do this, but I thought it was an interesting ideA.
Trim/Flap ControllersTop
The website has a lot of description, but I am looking to add a little control to the trim system on my airplane. TCW Technologies has a couple of interesting products. After doing some reserach on flap controllers, I’ve located FPS-Plus. Their website is here. Basically, a momentary push of an (ON)-OFF-(ON) switch will take you up or down to the next flap detent. Holding one of the buttons for more than one second goes all the way up or all the way down. Seems pretty slick to me, and allows for a backup flap switch and trim setting coupling based on flap setting. It needs some specific switches and some specific potentiometers for flap positioning, but still seems like a very cool addition to make (appears you can retrofit to an existing installation, too, so I can wait to install until after first flight).
Smoke SystemTop
How cool would that be. I don’t know how hard or expensive it would be, but it would be cool. I stumbled across this video in youtube. Pretty cool.
Going for a Ride 1
Removeable seat and baggage pansTop
I like the idea of having the seat pans and baggage floors removable. I know this means a lot of nutplates, but I think it would be worth it for long term upkeep, annual condition inspections, and any future improvements I may want to make to the airplane.
I need to look up the nutplate callout for the tiedowns. I’ll find those later.
After some reseach, I like what Bill Respucci has done for his ELT and strobe power supply.
")
Here is Bill’s baggage floor door on the right side for his ELT. I like this.
")
Same thing on the other side with the Strobe power supply. I like this, too.
Sam James CowlTop
I hear the Sam James cowls are fast, and I like the way they look. I haven’t realized price delta yet, but I think I might look into it. Here are the 6,7, and 9 cowls from Sam James.
Alternative Wheel Pants and WheelsTop
Dick martin from RVBuildershotline.com article: “Want 3-5 more knots? Martin recommends against the Van’s wheel pants design. go with the ones designed by the NASA guys, he says.”
I think the new style wheel pants are the pressure recovery pants, and are the “fast ones.”
More about wheel pants, though, Here’s a pretty nice way to attach them.

Things to note: the pant is secured to a bracket with flush fasteners, and the front have secures to the back half with 5 flush fasteners. Pretty easy tire/brake inspection.
About wheels…someone on VAF just bought the Beringer wheels, and they look really nice (tubeless?).

See? They look really nice.
I bet they cost a fortune.
Electronic IgnitionTop
Lightspeed Dick martin from RVBuildershotline.com article: “All the guys who go fast have Lightspeed ignitions. There’s a whole bunch of others out there, but they’Ave all used Lightspeed. He has the best. There is no such thing as a bad start. It starts like your car, especially if you live up north,” he says. Martin says an article in Sport Aviation a few months ago was “an excellent dissertation on the differences Lightspeed has ability to time intensity and duration of the spark so you get what you pay for. All of them will save you at least a gallon of hour in fuel consumption.”
g3i Ignition Also, there is g3i. This is pretty appealing because with a small modification of your Bendix or Slick magnetos, the g3i system does it’s thing, and if it were to fail, the magnetos revert to normal magnetos. How cool is that? More at http://www.g3ignition.com/.
Brake Fluid, Lines, PedalsTop
I read somewhere to use Loctite 567 (Teflon) sealant on all of the fittings.
Worried about brake fires, use ROYCO© 782 Synthetic Fire Resistant “Super Clean” Hydraulic Fluid, MIL-PRF-83282D. Stainless steel brake lines. (From Bonaco?)
If you shorten the rudder cable ‘links’ and mount the rudder bars a little more forward there’s no problem. I have had no problems so far in 160 hours and my pads look like they can go another 160 or more. I also installed auxiliary return springs on the master cylinders which I feel helps with brake life.
Can’t remember who said that, but I snagged this picture from Ryan at www.vansflyer.com/vansflyer. It’ll help remind me to do the spring trick on the brakes.
More on that, apparently the Matco cylinders have less play than the cleveland cylinders.
Here’s the parts list for the spring additions, care of LifeOfRiley on VAF:
RV Brake Spring Parts List
I used the following from McMaster Carr
www.mcmaster.com/
(1) Pkg 6389K625
Nylon Bearing Flanged, for 3/8″ Shaft Dia, 1/2″ Od,
3/8″ Length, Packs of 5 $1.97 Pkg
(1) Pkg 9657K115
Steel Compression Spring Zinc-Plated Spring-Tempered, 3″
L, 1/2″ Od, .047″ Dia, Packs of 12 $5.29 Pkg
(4) Ea. 9946K13
Aluminum Set Screw Shaft Collar 3/8″ Bore, 3/4″
Outside Diameter, 3/8″ Width $1.82 EA.

Springs and collars on the brakes. Helps them return to what I’ll call “off.”
Apparently, I should upgrade to the Grove brakes. (Twice the kenetic energy stopping power?) Get the magnesium wheels? Also, I could upgrade to the Grove master cylinders, which are adjustable and have stronger return springs. Something about switching from Nitrile to Viton o-rings. Nitrile is only good for about 275F, while fluorocarbon (Viton) o-rings hang in there to 450F. (-218 V75 (1.234 X 0.139) 2750 $0.17 – $0.50)
Also, from a post I stumbled across, do these:
1) The long bolt mod. Use (4) AN3-56 bolts as the axle of rotation for the rudder pedal instead of using 2 smaller bolts per pedal. Obviously having a single axle of rotation is better than (2) almost the same axles of rotation.
2) Return springs. These help the brakes return to the non-braking position. The mod calls for a spring, stop, and collar on the shaft of each master cylinder. I suspect the left brake was dragging, and I’m hoping this will help improve pad life. It’s an easy mod. See pic here. Part list required is here.
3) DOT4 conversion. There are a lot of threads on what fluid to use, including Mil-5606, Mil-83283, Synthetics, Dot4, Dot5, etc. I chose dot4 fluid due to its availability and resistance to fire. If you use dot4, the o-ring mod is required. You also need to use brake lines that are dot4 compatible. The lines that come from Van’s are not. Stainless Steel Aeroquip 666 will work. If you’re sticking with the MIL stuff, this is not required. I’m not necessarily pushing the dot4 mod. Thanks to Charlie Kuss for being THE source of O-rings to adapt all the brake components to support Dot4. He sent me a complete kit of O-rings with pictures. Replacing the O-rings is very easy.
4) I also was recommended not to use the default plastic brake lines between the pilot and pax, and that I’d be rewarded with brakes that aren’t as susceptible to becoming mushy. The line from the pax to the reservoir would still be the default plastic lines. I haven’t done this yet, but maybe next time I service the brakes I’ll remember to measure the lines and have the new fittings and hoses at the ready…
Oil CoolerTop
From a VAF post:
I have one of the NonStop Aviation butterfly valves in my RV-10. Actually just got done installing it last week.Some observations:1) Very well made. 2) Ridiculously easy to install (30 minutes or less) 3) Uses a standard ACS 740 cable to move the valve from within the cockpit. 4) Works as advertised.The only negative I found with it was this:The manufacturer uses a small pop rivet as a stop for the butterfly valve to hit when it is fully closed. The problem is the rivet is too small and the valve can actually get stuck on the rivet.After installing it, I went out and flew the plane for several circuits in the pattern and found that by closing the valve about half way I could easily raise the temperature of the oil from 155F to 175F (pretty cold day). I then closed the door all the way and found that it was “stuck”. Not a big problem since in the five minutes it took to land the tempature only went up another 2 or 3 degrees.I took the cowling off and could see that when i closed the valve all the way the valve was stuck on the rivet. The easy fix was to drill out the rivet and replace it with a machine screw and a castle nut that sticks down further.So, overall I am impressed with the unit and am very happy with my purchase. Nothing against the more complicated designs including electronic ones, but this is a solution that begs for a nice simple design.Oh, one more thing. The NonStop Aviation unit comes with everything you need except one 4″ hose clamp.
For actual oil cooler, I stole this from a post on VAF (which was originally talking about how great the SW8406 oil cooler is):
We originally had the Van’s supplied Niagara 7-row cooler on the RV-8 in my avatar. It was woefully inadequate for the heat-monster ECI Titan IO-360 engine (from America’s Aircraft Engines). Oil temps in the 230’s. We then installed a 13-row Aero Classics cooler (IO-540 sized) and I actually got it to fit on the rear cyl #4 baffle, but it was way too close to the engine mount, and also rubbed the fiberglass cowling a little. It cooled too well also, and was just simply overkill. The third cooler I installed is an SW10599R 9-row unit (~ $650). It cools just right in hot Texas summer heat, but had to fabricate a pilot-controllable air door to restrict airflow over the cooler for winter flying.
There is a much cheaper alternative to the expensive SW cooler… the Aero Classic 10-row cooler is just about the same exterior physical dimensions of the SW10599R and costs less than $260 from Spruce. For tighter spaces, they also make a 9-row cooler too, that would likely outperform the 7-row Niagara cooler by a significant margin.
The design and build quality of the SW coolers are definitely the best of all three brands I’ve tried, and if an extra $350 is not that big of a deal to you, then the SW is definitely the brand of oil cooler to get.
Constant Speed PropellerTop
I’m pretty positive I want a 3-Bladed constant speed propeller, for a variety of reasons, some of which are:
- Speed
- Lack of vibration/noise
- Flexibility in climb/cruise
- Cool factor
The obvious choices are:
- Whilrwind 3-Bladed Constant Speed Propeller – 151 Series
- MT 3-Bladed Constant Speed Propeller
- Hartzell 2-Bladed Constant Speed Propeller
EngineTop
Why an IO-360? I want the fuel-injected climb and cruise performance. I seem to be able to justify the extra cost at this point in the build (empennage), but I wish money were no object…then maybe I would be putting a 390 in there. Fuel injected is a must for me for a variety of reasons, safety and reliability are just a few of those reasons. Also, I’d like to do a build-it-yourself program. Eagles engines has a nice thing goign with their Xtreem series: http://www.eagleengines.com/xtreem.htm
Dynamat Firewall insulationTop
I saw (in the March 2010 edition of the Minnesota Wing’s online newsletter) a small article about Dynamat. Looks like cool stuff. Here are a few quotes from the article by Doug Weiler.
The product is commercially known as Dynamat and is used for insulating surrounding automotive audio installations. It is only about 1/16” thick with an aluminum foil front, sticky on the back, and in between is a very dense rubbery material.

Dynamat, the backside.
The version Jed used is called Dynamat Extreme and weighs .44 pounds per square foot. According to their specs it suppresses almost half the sound passing through a thin steel sheet. I did a quick and dirty measurement of my firewall and figured it would add about 3 pounds to the airplane. I had intended to use 3M’s 1/4 –inch aluminum/foam/sticky-back product that is lighter but I thought I’d order some Dynamat panels and give it a try.

An RV-7 firewall. I hope mine looks this good.
I did a very un-scientific burn test and it would not support a flame (unlike the 3M ! foam which seems to burn rather handily). It cuts easily with scissors and I tried it on some test pieces. Once it is in place, the most amazing thing is that when you thump on the firewall on the engine side, it sounds like you are thumping a block of wood. It is a totally dead sound.
DecalPro InstructionsTop
I snagged these instructions off of Bill Repucci’s website on his instruments page. Great Resource.
1) Draw/type up the labels and put a BIG black box around them, leaving enough room between the actual label and the inside edge of the box so you can handle them w/o touching the label once the box is cut off. (Yes, the sample I posted earlier was redone with boxes.)
2) Print four copies of your label sheet on the laser printer using standard white paper to warm it up and then follow those copies immediately with one copy on the special blue carrier paper.
3) Cut out one label from the blue carrier paper and dry it with a heat gun w/o touching the text.
4) Run the label through the laminator with the color foil of your choice. Use the hard plastic board provided in the kit for backing.
5) Peel the color foil back.
6) Use the white tape provided in the kit to lift off any color that is filling the “O”s, etc. from the label. Again, do not touch the label with your fingers. (The laminator melts the plastic color into the black laser toner and any place where there is moisture on the blue carrier paper. The tape will lift off any excess color that is not stuck to blue carrier board.)
7) On a clean paper towel, put a piece of the clear transfer down. Either side up, it doesn’t matter.
8) Squirt some Goof Off on it and rub it clean with another paper towel. The trick here is to build up a good static charge on the foil so press hard and rub fast, in one direction.
9) Put the clear plastic Mylar over the label, place it on the hard plastic backing board and run the label through the laminator. This will cause your colorized text to adhere to the Mylar. The text is held in place with static electricity and a little bit of melted Mylar. What I’m trying to say is the label is very fragile at this point so try to be gentle with it.
10) Drop the label with the clear plastic still attached into the water bath w/ minimum disturbance to the water.
11) Leave the label alone until the plastic floats away from the blue paper. Once the Mylar floats free, dip it in the water bath a few times to clean off any excess glue.
12) Blot, do not rub, the label dry using new, clean paper towels. 13) Using a cutting board, not scissors, cut the boarders away from the label. I do this with the label side of the Mylar up so as not to rub off any of the letters.
14) Put a paper towel down, lightly spray it with the glue provided (and I mean lightly!), and stick the label to the paper towel, letter side up. You shouldn’t be able to read the label as you should be looking at the back of it.
15) Clean your panel with rubbing alcohol and let it dry.
16) Give the label three quick blasts of the glue from 12″ away. Give your panel one to two quick squirts. Do not saturate either. More glue is not better, in fact it will make things worse.
17) Apply the label, pushing it down with the tip of a tea spoon or some such instrument.
18) Lift the clear plastic away from the label.
19) Stand back and admire your label! If the label is messed up, not where you want it, etc. stick some blue 3M painters tape over the label and lift it off.
LightingTop
February 2018 Update:
I found the Flyleds stuff.
- DIY KIT: LED strobe and position lights US$249
- Tail LED-kit model US$99
- WigWag heatsink kit US$15
- The Skinny Boards US$1
- Wiring loom, Crimp plugs, US$149


August 2017 Update:
I like the AeroLEDS stuff. Now Thinking:
AeroLEDS Suntail $395
January 2011 Update:
After reading a little more, I’ve found that people who do the two lights in each wingtip dance aren’t happy with the amount of light they are getting from their landing/taxi lights. I thought they were talking about the regular halogen bulbs provided with Van’s wingtip light kit, and that the people who are using the HID wingtip lights are generally very happy with the light output.
After even more reading, I’ve decide that the leading edge light is really the way to go. Now, I think I am going to put a single HID (PAR 36 style enclosure, ordered from Duckworks) in each leading edge for landing lights. These won’t wig-wag. I went ahead and ordered a Raptor HID kit from DDM Tuning.
They had a whole bunch of bulb type options, and a $10 upgrade to 55W (from the $30 35W version.) You can also choose your bulb temperature. I chose 5000k based on the graphic they have.
To summarize, I ordered 55W, 5000K, H3 style bulbs. For $40, it’s worth trying these inexpensive HID lights instead of the $250+ lights from “aviation” companies.
Then, I’ll use the wingtip lights for taxi/recognition, with wig-wag. I can use the smaller MR16s in the wing, and point one set wide, and one set toward the centerline. If I use regular halogen bulbs in these, I won’t have to use a warm up circuit, which is good, considering that when up at cruise and ATC calls with a traffic alert, I’ll be able to immediately start wig-wagging them for recognition. That gets rid of my need for an automatic warm up circuit (won’t be using HIDs for wig-wagging).
I’ll figure out the mechanics of the wingtips taxi lights later (single light in each wing? 2 MR16 halogens in each wing?)
Here was my old scheme:
Two lights in each wingtip, fabricated in a similar way to Mike Bullock’s setup.
Instead of using two 50W HID bulbs in each wingtip, maybe I’ll downgrade one set to the 35W for Taxi (which will still be a ton of light output) or try to downgrade further to regular halogens, positioned so they light up as much area as possible.
I will keep one set as 50W HIDs and use them as my high powered landing lights.
Now I have to figure out how to flash them. Apparently they need some warm-up time, which can either be procedural, or by circuit. Hmm. I’ve read a little about XEVision. They have a 25 second delay on the flashers. I feel like I could make my own, though. We’ll see.
Check http://www.strobesnmore.com/index.php?cPath=15
Just for posting’s sake, here are some pictures of what I am after:

Ooh.

Ahh.

Homebrew position lights

Landing/Taxi lights on.
Tailwheel IdeasTop
I’ve see the Vince Frazier tailwheel (for use with a fairing), but I like the looks of the Doug Bell tailwheel a little more.
I do plan on doing the tailwheel fairing at some point, so I need to make sure both are compatible.

I think this is from Pat Hatch.
MapboxTop
There was a posting this weekend on a cool place to include a mapbox. This is a picture of an -8, but you could apply the same thing to the -7. I don’t know how it will go with my fancy interior, but we’ll see.

asdf
Here’s Rick’s version of a mapbox, behind the pilot. This would also be a good place for the RV-8 box pictured above, with a closure.

I also like the storage behind the headset jacks.
Battery Charger LocationTop
This was a cool idea I snagged from Fred Bauer, Jr on his RV-3B. I snagged this picture from his picasa album. I think it would be helpful to have a battery charger plug. I don’t know if it needs to be a GPU plug for starting amperage, but maybe just a small one. (Plane is dead, I can’t start it from a GPU, but I’d have to wait an hour or two for a battery charge.

I also like the idea of it being under the flap, but what if the battery is dead and you can’t lower the flaps. Hmm…
Interior IdeasTop
If money were no object, I would go with a full up package from Classic Aero Designs. On their RV-7 page, they have a wide variety of products, some of which I have captured here. First thing, (RV679-PKG) Aviator Seat Package with Headrests, $2423

Aviator package with headrests.

Here they are in what looks like a -7A slider.
")
This is Chris Sands’ RV-7A tip-up. Beautiful.

The frame (and new headrest) is integral to the seat.

Here’s the comfor foam that is used.
Of course, then I am going to have the get the embroidery. How can you not splurge for this?

Except it will be N999ZA.
Of course, with the seats, you have to have the Floor Carpet ($346).

This seems pretty required for insulation from cold and noise.
Underneath the seats, you can leave the bare aluminum, or add the Seating Area Carpet ($267).

This will be a nice touch.
Also in that picture, you can see the now required Leather Stick Boot Package ($127).

This stuff all seems to be really high quality.
More cabin stuff:

I like this upper baggage panel piece, but this is purely aesthetic. Also, I won’t be able to modify it at all for a hat box or anything.
RV679-ITM19 Deluxe Glare Shield Trim for Tip Up 153

Some of the cheaper glareshield trim looks horrible. I like this stuff.
In this picture, you can see some of the Aviator Side Panel Package ($1434), which includes the armrests and some other nice things.

This is kind of the whole picture. A little dark, but you get the idea of the finished product.

Another “whole package” picture. Looks nice.
Pushrod Boots ($81). So no cold air enters the cabin from the wings.

To stay warm from the cold air entering the cabin area (below the BUTT!) from the wings.
RV Flight Bags ($89.95)

This seatback bag fits just behind the seats (slanted forward side).
And CAD also sells Hooker harnesses. 5 Point Harness Set with Rotary Buckle (non-certified) – $410 per Seat (The regular buckle drops this to $260 a seat.)

5-point Hooker harnesses.
Electric Seat Heater Set ($179).

Why not? I’m already splurging on all of the other stuff.
Prefabricated Fuel Pickup TubeTop
Prefabricated Fuel Pick-Up Tube from Vans for $15. Apparently these are nicer than the customer built ones.
Installs inside fuel tank, replacing scratch built unit shown on plans. Complete with AN fitting and stainless steel finger screen. The screen is the thing that is better. On the customer built ones, it is an AN fitting with some saw cuts in it that necessitates an inline fuel filter downstream.

Bad drawing from Vans, but you get the idea.
Deluxe Lockable Fuel CapsTop
Deluxe fuel caps from Van’s for $100 each. Supposedly worth it, and lockable.
These fuel caps are being produced in England for a variety of homebuilt planes. They can fairly easily be adapted for use in Van’s Aircraft fuel tanks. They consist of the cap, flange for tank mounting, and key set if a locking version. These caps will NOT fit the standard fuel tank flanges supplied in Van’s kits so they are really only suitable for use if you are building new tanks. A fuel cap w/flange is sold as a single item. 2 fuel caps are required per airplane.

I want the locking ones.
I ended up ordering these with my wing kit, and I’m really glad I did. If you order them in advance, you get a $53 credit on your wing kit (because they don’t have to send you the standard caps), so they really end up at about $80 per piece instead of $105. Works for me.
Here’s the picture of mine sitting on my workbench.
")
They are super nice.
Very satisfied with these, although I don’t know if I’ll ever need 4 keys.
Andair Fuel ValveTop
Andair fuel valve……almost everyone thinks they are worth it.
Beautifully crafted valves made by RV (and Airbus component) builder Andy Phillips. Lifetime materials, compatible with all fuels. The FS20x7T valve has a 90 degree swing and a positive “lift and turn” feature to prevent inadvertently selecting the off position. 90 degree AN6 elbows are installed to facilitate typical RV installations. The FS20x20-3 valve has the same features but is a dual valve with 180 degree swing, 3/8 NPT ports for fuel supply and ¼ NPT ports for fuel return to the selected tank. Usually used with automotive engines that require fuel return to the tank, not required for typical aircraft fuel injection systems.
The 90 degree version is $205 and the 180 degree version is $365.

The Andair one is on the left.
Conduit RunsTop
Conduit for later wire runs. I trust these are worth the effort. More later.
I snagged this of of Mike’s site:
A whole lot of wire was consumed tonight! I ran wires for the wingtip landing light, taxi light, nav light and strobe. I am planning on putting in the Duckworks MR16 50W HID landing the taxi lights, and the AeroLEDs Pulsar NS90 navigation/strobe LED lights. This took a total of 6 wires. Two 16 gauge wires for the landing/taxi lights, two 18 gauge wires for the strobe ground wires, a 20 gauge wire for the navigation light and a 22 gauge wire for the strobe synchronization signal.
This is essentially the same as my proposed setup, so this is good information to keep on hand for the (distant) future.
DIY In-Ear HeadsetTop
From VAF:
Plantronics 480 ($20.44 shipped)
Comply T-400 Tips ($14.95 for 3 pairs)
And from Mouser:
1x Small Case ($2.96)
2x 3.5mm Jack ($1.29)
1x Red 1/4″ Audio Plug ($6.90)
1x Black .206″ Mic Plug ($9.02)
Mine was wired straight through with no transformer. Audio with tip/tip, ring/ring, sleeve/sleeve. Mic was sleeve/sleeve, (headset)tip/(plane)ring. Clearest audio I’ve ever heard in a plane, and ground/unicom reported “quite loud and clear” without prompting on my radio check. I am going to try a 5v bias on the mic ring, as you have to talk fairly loud of the mic to “start working”. Once I’ve experimented with that a bit, and tested actually flying, I’ll post what worked for me.
Oh, and it’s light and comfy. This was a Garmin GMA 340 audio panel and 530 radio (in a DA20).
For the mic connections, I left the headset-side mic “ring” wire [bias, I think] and airplane-side “tip” wire [PTT] unconnected. …I swapped the red/black cases so the mic was the red jack. Also picked up a stereo “extender” cable locally so I could find one in-person with a good feel…nice flexible but tough 1/4″ cable. Cut the ends off and in half to use for the “to plane” wire. Other than that, just drilled the case and soldered the wires to the jacks and plugs. (I didn’t have a spare headset to use, and since the Plantronics 480 is a little delicate, wanted to be able to use it without modification…and build an “adaptor box”, which could also work with any other PC headset too. I’ll probably order two spares in case they become hard to find.)
I actually got 3 mini jacks, so I’m going to use the 3rd as an input for a battery back with a variable bias resistance and voltage to the mic’s ring contact so I can experiment with the best mix for radio and intercom use (if it helps at all…). Will post what happens…and document the wiring if it works well. )

Here’s a picture of DCat22’s setup. I’ll be trying to mimic this.
Cowl Attachment MethodTop
I know Van’s has you use hinge pins to attach the cowl, which gives a nice clean look. With that method, you have to have some way of attaching the hinge pin near the engine inlets. I like this, which I saw at the Mid-Atlantic Fly-in.

See the metal piece? It is attached to the cowl hinge pin.

Looks like it is attached from the inside of the cowl.
Or you can use 1/4 turn fasteners, like this:

1/4 turn fasteners for cowling attachment.
I’m still not sure what I am planning, just capturing this stuff for future thought processing.
Fuel Sampler AttachmentTop
Again from Bill’s site:
")
So simple, it’s ingenious.
I saw another one on a Pilots N Paws trip.
")
This is a pretty good place for the tester, but I would worry about fuel vapors with all of those electrons hanging around. I’ll think about this some more.
Headset Jack LocationTop
There is plenty of discussion and hand-waving about where to put the headset jacks. Typically (pronounced “in some certified airplanes”), they are either on the instrument panel or beneath the panel (jacks pointing up). I don’t like that because now you have a cord dangling from around your neck, to your lap, or by your leg, and back up at or near your feet. It can get in the way of the stick, switches, controls, etc.
Ideally, the headset cords could go back behind you to a location that kept the cords from interfering with inflight crew duties, was tangle-proof, and allowed easy access in flight (assume you accidentally pull it out and have to re-plug your headset in).
Rick’s location here is interesting.
Nice headset jack location. My only nervousness is that the jacks might be sticking in the back of your elbow.
So is this, but I’m not sure it is reachable in flight. Also, I’ve heard of crush danger if the cords have the ability to slide between the flap-brace (horizontal support) and the seat backs.
")
That’s a pretty cool place for headset plugs, but unreachable in flight. Hmm.
PolishingTop
From PerfectPolish.com:
Suggested Order of Use on Average Skin:
1. Compound with C, F7 or G6
2. Cyclo with F7
3. Cyclo with S
Ski/Golf Club BaggageTop
After seeing a few pictures, I think I am going to entertain the idea of building a cargo box further back into the fuselage than the normal baggage compartment.

I snagged this off of Barnstormers.
I think mine will be along the floor, and further back, but on the passenger side only. That way, I can get skis in there, as well as a couple sets of golf clubs further forward.
I would be very careful to reinforce any baggage compartment bulkhead openings I create, as well as completely sealing off the compartment to prevent control interference.

Another hat-box type idea.

Another hat-box.
More later.
Covers/Hangar JammiesTop
Saw this on an email list:
I’ve used AviationCovers.com out of Arlington, Washington and have been extremely happy. They just made a set of Hangar Jammies for the RV-7 and they’re great. My “traveling” strap on canopy cover is light enough but weather resistant. It covers the tip up hinge opening area as well and keeps things dry. Got to get it tight, though, or it flaps.
Panel LightingTop
I snagged this off of VAF from a post by Bugsy.
I researched several LED light strips for placement under the glare shield.
First photos of the end product: The strip is on a dimmer, this is full blast at night with all lights off in the garage. With this on full blast you can see throughout the cockpit. I wont need any other cockpit ambient lighting. The glow is comfortable and very cool. Dimming reduces canopy reflections.

Nice blue. I might go with red or white, but you get the idea.
Now the facts:
RV7 – 3.5 feet is a great length for the LED strip. 3ft would be plenty.
Dimmer is highly recommended, use a lower wattage SMD3528 strip if using without a dimmer.
I bought 3 different LED strips to experiment:

The one on the right is shown above.
All driven together with a 12V power supply:
On the far left: 120CM LED strip bought off ebay for $5 shipped. version SMD 335.
Center: 120CM LED strip from EBAY for $15 shipped.. version SMD 3528. 1.44W/foot, 0.12A/foot
Right: 4ft LED strip from http://www.ledlightsworld.com. This is what I installed in the plane. Cost $60 shipped. 3ft would have been enough and would have saved $13. Version 5050 18 LED/ft. 4.32W/foot, 0.36A/foot. So my 3.5feet put out 15 watts at 1.26A at full grunt, I have a dimmer installed on the panel.

The one of the right has a lot of capability.
Bottom line: I am very happy with the SMD5050 300LED/5meter or 18 per ft version of the LED light strip. At total of 15 watts, it provides plenty of light at a soft glow that impresses all who see it.
Cap Screws for the Fuel Tank Access PanelsTop
More from Bill…
The other tip I have is to order a bunch of stainless 8-32 ½” cap screws from McMaster-Carr and use them to secure the cover plate for your fuel tanks. Once the wings are installed, I doubt you could get the pan head screws off but the cap screws will be easy to remove. See this picture:

From Bill’s site…
Wire Routing in the TailconeTop
Many people use the plastic zip tie bases, but the stock sticky stuff comes off. The solution is to soak the bases in laquer thinner and peel the tape off, substituting something more like “e-6000,” or doing something like this (which is beautiful, care of Bill Pendergrass…more here)…
Tank Building SequenceTop
Tips from Mike Cencula in a VAF forum reply:
My sequence was something like this:
Cleco / match drill everything
Drill and test fit all holes for fittings, BNC connector, outboard and inboard rib nose doublers, trap door, anti-chafe strip / anti-hangup strip
Disassemble / debur / dimple everything
Rivet stiffeners
Block off the 1 1/2 diameter hole in the rib where the flop tube goes
Rivet on all rib accoutrements (doublers, trap doors, etc)
Rivet all ribs
Rivet filler neck
Install vent line
Install flop tube
Install capacitive sender plates
Run wires / install BNC connector
Install baffle
CupholdersTop
I really want to do a set of cupholers in front of the fuel selecter. Just like Chris Sands’ example here.
")
Good location for cupholders.
SupertracksTop
Supertracks Canopy Track Extension
Our Price: $349.00
Sale Price: $329.00
Savings: $20.00
https://www.flyboyaccessories.com/product-p/1401.htm


